Chris
October 19, 2016
Garden
Acer, propagation, seeds, Tips, trees

Sow seeds at any time of year in trays or pots about quarter of an inch deep in good seed compost. Place in a propagator or warm place. Seal the container inside a polythene bag to ensure a humid atmosphere and leave for 6 weeks. Place outdoors for eight weeks to chill. Transplant seedlings when large enough to handle into 3″ pots. Grow on in a cold frame and plant out the following spring or autumn in a sheltered part of the garden. It may be up to three years before you can plant into it’s final position. Choose a slightly shady, sheltered spot in moist, free draining, lime-free soil. Sounds easy doesn’t it. I understand you can also use prunings to grow from a cutting. Ah well, the seeds cost nothing so I shall give it a go.
Update Sunday 30th October – the seeds are in a tray of damp compost which is inside a polythene bag. They have to stay like that until the middle of December. Tray put outside middle of December. Update 17th January. Tiny green shoots showing.
Chris
October 15, 2016
Garden
Clematis, climber, cuttings, flowers, propagation, Tips

I have been taking stock of the Clematis in the garden and reading up about how to prune or propagate them. Softwood cuttings are best taken between April and June from the mid-sections of strongly growing vines. The tips will be too soft and the lower parts may be too woody. Prepare the selected section of vine by cutting through it immediately above a leaf joint and again about 3-4 cm below the same node. Remove the excess foliage to reduce moisture loss. Insert the cutting into compost up to the leaf joint. Label the pot and water it gently. Cover the surface of the compost with grit to deter slugs and retain moisture. Place in a well-lit area out of direct sunlight and maintain a humid atmosphere by covering with polythene or a propagator. Bottom heat will aid rooting but is not essential. Rooting should occur in four weeks. Pot up separately when rooted but if they are not ready by late summer delay the job until next spring and grow the cuttings on for another year before planting out.
Chris
July 11, 2011
Cooking, Garden
fruit, Lidl, preserves, produce, Recipe, Tips
This morning I made three jars of jam from some of the fruit collected from my Victoria Plum Tree bought from Lidl. They are really tasty straight from the tree but lovely made into jam so that we can have the taste right through the winter too.
I usually cook large stoned fruit quite well in a little water and lemon juice then when the stones are floating on the top I put the whole lot through a seive and combine it with a little preserving sugar. There is pectin in the stones so no need to add more. Stir the fruit pulp and the sugar until the sugar is melted in then turn on the heat and bring the mixture to a boil. Keep stirring until the setting point is reached, not long with plums, and then pour into your jars using a funnel.
Chris
April 21, 2011
Garden, Pond
Aubrieta, flowers, Tips
Now the ducks have moved home we have reclaimed the pond and have both spent time cleaning it up. Rob managed to get all the mud out and I have made the beds surrounding it ready for planting. Yesterday I bought two Aubretia plants from Mick Market at the allotment and they are now sited at the back of the pond with the hope that they will spread and hold back the soil and stop it from dirtying the water. Tip – Cut back quite hard by shearing after flowering has finished to maintain a neat, compact growth habit and to encourage a second flush of blooms. Incorporate ericaceous compost into the planting hole for best results.
Chris
April 16, 2011
Allotments, Vegetables
brassica, broccoli, Brussel Sprouts, seeds, Tips
I have sown a batch of Brussel Sprouts Noisette. Noisette are an old French variety that produces small to medium sized sprouts with a nutty flavour. Tip – Cut the top from this plant as soon as big enough to eat. This encourages the rest of the sprouts to mature at the same time rather than gradually but can reduce the crop slightly.
I have also put in some quick growing Broccoli Autumn Calabrese seeds. I have sown them thinly in a tray of moist seed compost and enclosed the tray in a polythene bag. I shall keep them indoors until they germinate which should be 14-21 days. They will need potting on and hardening off before planting into their final position but I am more confident with that now. At first I was very nervous when growing brassicas and lost a lot of seedlings.
Tip – Once you have cut the large central head from Broccoli leave the root in and you will more than likely get some tasty side shoots.
Chris
November 1, 2010
Allotments
fruit, Lidl, Raspberry, Tips
We potted up three raspberry canes yesterday. They were from Lidl so only £2.47 for the three. They look very healthy with a good root system but have no variety on them or any indication as to wether they are Summer or Autumn fruiting. I already have one raspberry plant given to me by my sister. We plan to erect a post and wire row for them all in the Spring.
Raspberries are best in full sun. They produce new canes in the first year and these canes fruit in the second year. First year canes are green and second year canes have a thin brown bark. It is best to prune back the cane after it has fruited. Maybe we will do what we do with the red currants and cut the wood back whilst it is covered in ripe berries. That way you do two jobs in one and the branch can be taken home to remove the fruit then trimmed and used as a cutting for a new plant.
Chris
June 18, 2010
Allotments, Vegetables
leeks, Tips
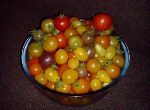
Rob came and met me at the plot and we planted forty Leek plants. The long awaited rain came just as we were finishing. We use the popular method of planting Leeks which is just dibbing a good hole and dropping the plant in while pouring water in to settle the roots but not back filling with soil. We are fast running out of space and still have more leeks, onions, pumpkins and the Gardeners Delight tomatoes to plant.
Chris
February 5, 2010
Allotments
seeds, Tips, Tomatoes
Today I have sown one seed each of Tomato Ildi, Lemon Tree, Snow White, Moneymaker, Tigerella and Black Cherry. They are each in a 3″ pot in John Innes seed compost and for the moment are sitting on the computer box. Germination should take seven to ten days if kept at a temperature of 18-21c. Tip – It is a good idea to provide some sort of covering over your germination containers to preserve moisture. You can place the container in a plastic bag or cover it with a sheet of plastic. Allow for some air to circulate but don’t let the mix dry out. Dry seeds will not germinate.
Chris
July 29, 2009
Allotments, Cooking
fruit, preserves, Tips
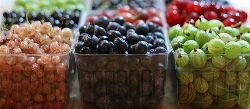
The currants have done really well this year and I have frozen quite a lot ready to use in the winter months. Last night I made jam with red, black and pink and although the jars are an assortment of previously used ones it all looks very colourful and tastes wonderful. I think I shall make an effort next year and get some nice jars from Wares of Knutsford especially for the job.
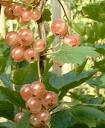
This is the first year that I have made red and pink currant jelly and I am very pleased with the taste of both. Last year was the first year of the bushes and we only had enough for mixed fruit and ice cream a couple of times. They are both very pretty bushes and looked beautiful hung with multiple strings of bright jewel like fruit.
When the fruit first turns red or white it is not yet fully ripe, so harvest only once it has sweetened. It is simplest to cut the bunches of fruit, called strigs, using scissors. The fruit can be stored in the fridge for a week or two after picking. Alternatively, freeze the fruit or preserve it.
Chris
July 28, 2009
Cooking
gooseberry jam, preserves, Recipe, Tips
Last night we went to the plots and while Rob laid a wood chip path in the fruit tunnel I picked the rest of the fruit. The gooseberries are past their best now really. We have already picked and frozen a lot of the red so I decided to pick some green ones and make some jam.
Put the gooseberries and a little water into a saucepan. Bring to the boil, then simmer gently until the skins are soft . They will not soften after the sugar has been added. I always sieve the cooked fruit in the case of berries and currants. This also means that you can leave stems on as they will be left behind in the sieve. After sieving put the pulp/juice back into the pan and add the sugar. Use fruit and sugar in equal amounts. Add the sugar and stir over a low heat until it has dissolved completely. If you boil the jam before the sugar crystals have dissolved you will get crystallisation during storage. Bring the jam to a rapid but steady rolling boil, stirring continually in a figure of eight movement to keep the jam from sticking. Do not leave unattended. It should take about fifteen minutes to reach setting point. Pour the jam into the heat proof jars using a jam funnel. I always stand the jars in the sink just in case of spillage or breakage. Enjoy.

 I have been taking stock of the Clematis in the garden and reading up about how to prune or propagate them. Softwood cuttings are best taken between April and June from the mid-sections of strongly growing vines. The tips will be too soft and the lower parts may be too woody. Prepare the selected section of vine by cutting through it immediately above a leaf joint and again about 3-4 cm below the same node. Remove the excess foliage to reduce moisture loss. Insert the cutting into compost up to the leaf joint. Label the pot and water it gently. Cover the surface of the compost with grit to deter slugs and retain moisture. Place in a well-lit area out of direct sunlight and maintain a humid atmosphere by covering with polythene or a propagator. Bottom heat will aid rooting but is not essential. Rooting should occur in four weeks. Pot up separately when rooted but if they are not ready by late summer delay the job until next spring and grow the cuttings on for another year before planting out.
 Now the ducks have moved home we have reclaimed the pond and have both spent time cleaning it up. Rob managed to get all the mud out and I have made the beds surrounding it ready for planting. Yesterday I bought two Aubretia plants from Mick Market at the allotment and they are now sited at the back of the pond with the hope that they will spread and hold back the soil and stop it from dirtying the water. Tip – Cut back quite hard by shearing after flowering has finished to maintain a neat, compact growth habit and to encourage a second flush of blooms. Incorporate ericaceous compost into the planting hole for best results.